Knives

Recreate the basic edge
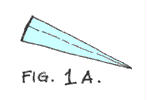
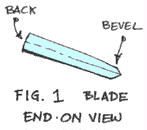 If you were to peer at the point of a nicely sharpened, multi-purpose knife blade, it would look something like Figure 1. You'll notice that the blade is actually beveled to form the final edge, but you won't create that bevel just yet. First, you'll form the basic edge, which is a little simpler in shape, as we see in Figure 1A.
 One of the key points of knife-sharpening is maintaining constant angles between the blade and the stone. There are two: the angle between the blade and the edge of the stone, and between the blade and the surface of the stone.
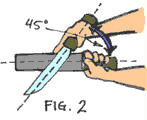
- Place your flat, medium-grit stone on the table in front of you. Lay the blade flat on the stone at a 45 degree angle, as shown in Figure 2. This 45 degree angle is the first of two angles.
- Grasp the knife by the handle. With your index finger along the back of the blade, raise the blade off the surface of the stone at a 20 degree angle, as shown in Figure 3. This is the second angle.

- Keeping the edge of the blade in contact with the stone, firmly and carefully draw the knife towards you. This action will grind the blade from hilt to point. Maintain the 45 degree angle, and the angle that you've raised the blade off the stone.
- Apply medium to light pressure as you're drawing the edge across the stone. (For the sake of comparison, zero pressure would have the knife blade resting on the stone without you touching it.) Apply a little pressure or a bit more, depending on how old the knife is, how many times you've sharpened it, and the current condition of the edge. A very dull edge will require more pressure.
Turn the knife over, and repeat the process. If you keep the knife in the same hand, you'll be pushing the blade away from you this time. It's important to maintain the same angles on both sides of the blade. Go slowly and alternate strokes on the stone until each side of the blade has been stroked several times. A very dull knife will need a few more strokes than a better kept one.
Create the final bevel
Now that you have a basic edge on the blade, it's a time to create the final bevel. This will strengthen the edge, so that it stays sharp longer and is less prone to be damaged by everyday use. You'll create the bevel simply by repeating Step 1, with two modifications: use a fine-grit stone, and raise the blade a bit higher off the stone (the second angle) when you draw it across.
- Place your flat, fine-grit stone on the table in front of you, and lay the blade flat on the stone at a 45 degree angle, as you did before.
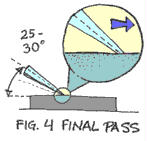
- Grasp the knife by the handle. With your index finger along the back of the blade, raise the blade off the surface of the stone at a slightly greater angle than before--maybe 25 to 30 degrees. See Figure 4.
- Keeping the edge of the blade in contact with the stone, firmly and carefully draw the knife towards you. This action will grind the blade from hilt to point. Hold the 45 degree angle, and the angle that you've raised the blade off the stone, as constant as possible. Again, apply medium to light pressure as you're drawing the edge across the stone.
- Turn the knife over, and repeat the process. Alternate strokes again until each side of the blade has been across the stone several times--about five strokes for each side should suffice. The pressure that you apply while drawing the blade across the stone should get progressively lighter with each stroke.
- At this point you should have a pretty sharp knife. You can test it by holding a piece of paper vertically, and drawing the blade across the edge and down. A sharp knife will cut the paper.
Some of the information and graphics on this webpage provided by the old http://tutorials.learn.com/custom/linkshare/linkshare.asp 
Really sad when good programs have to go awasy.
Copyright ©1996-2001 Learn2.com, Inc. Used by Permission
Knives Part 1 .


