How To Make a Campfire

1. Important Safety Rules:
Never pour flammable fluids onto a flame or source of heat. The fluid can ignite and the flame can (and probably will) run right up the stream of fluid to ignite the container in your hand, with explosive and extremely harmful (if not fatal) results.
Never try to extinguish a grease fire with water. This was the last lesson learned by quite a few people cooking in their kitchen. Adding water to a grease fire results in a shockingly large fireball. You are not likely to survive the results of pouring water onto a pan full of burning grease over your campfire.
Never leave a fire unattended in any stage between lighting and extinguishing. Do not go to bed while there is any fire or glow visible in your pit or ring. Left unattended, open flames or glowing coals (even ash-covered embers that don’t appear to be glowing) can very easily lead to a spreading fire.
Never put plastic, glass or metal items in a fire. Glass and metal can become dangerous at the worst, and constitute littering at the least. Plastic produces some truly noxious and toxic smoke that can harm people in a wide area.
Never use your fire pit or ring as your trash receptacle. The only items that should ever be added to campfire are wood and maybe some organic food trash (such as vegetable skins, but not fruit rinds).
Paper products should not be added at all or added with extreme care. Paper is often coated with plastics or impregnated with other chemicals that can produce noxious or toxic fumes, and burning paper smuts can be borne aloft and land somewhere to start more fires.
Always be aware of your hair or clothing when working with a fire. Tie your long hair back securely and roll up loose sleeves.
Always be aware of the prevailing wind or gusty weather. Watch to make sure that the wind doesn’t blow your campfire flames dangerously close to flammable materials.
Always be aware of the presence and actions of others around your campfire, especially small children or inebriated adults.
2. Plan Ahead:
This means bringing the supplies that will enable you to build your campfire with the greatest ease. Bring the essentials: some newspaper, matches, logs and kindling. If you buy your firewood in bundles at a local store, there will likely be a few pieces of kindling in the bundle already, but sometimes the smallest pieces of wood in the bundles are still basically logs. Check your bundle! You may find it necessary to chop up a larger log into kindling in order to make your campfire.
3. Teepee, or not Teepee?:
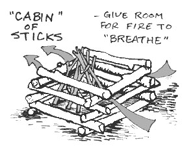
In a fireplace at home, you might be accustomed to making a fire using the technique known as "log cabin." A log cabin fire is basically cubical in shape. You start by laying down some newspaper and kindling (if you have a little grated rack inside your fireplace, the paper can go underneath while the kindling would go on top. On two parallel sides of this kindling and paper, you place two logs parallel to each other. Then, you add a second level of logs, spaced and parallel to each other but perpendicular to the base logs. When you look straight down at the structure, you see basically a square of logs framing the kindling and paper. You continue stacking logs in this fashion as if you were building a cabin for small, very unhappy lizards or something. You may be tempted to apply the same technique in a fire pit, but you shouldn't!
Any boy scout will tell you (and they’re right about this) that the better technique for a campfire is the "teepee"-style fire.
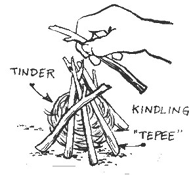
To make a campfire using the teepee technique, you will place your large logs in a teepee shape - vertical and leaning inward so that their top ends meet in the center. The end result is basically triangular and more vertically trained, whereas the log cabin was cubical.
Begin in much the same fashion as with any other fire - laying down newspaper and then kindling. Put balls of newspaper in the very center of the pit. Enclosing that will be a small "teepee" of kindling. Plant two sticks of small kindling in the ground vertically, opposite each other with the paper in the center. Now lean the sticks in at the top so that their top points meet and lean against each other over the paper. Continue to add opposite sticks around the center paper until the paper is surrounded by leaning kindling.
Around this, position the larger teepee of small logs.
Light the newspaper first, which in turn will ignite the kindling, which should hopefully ignite the surrounding larger logs. If your newspaper fails to catch the kindling on fire, tear off a little more newspaper and stuff it into the center once more.
The teepee fire will ignite efficiently and easier than a log cabin, requiring no base platform of logs for its ventilation. Once the teepee structure collapses, add logs carefully in the center of the blaze.
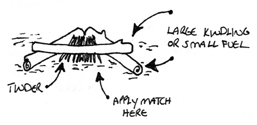
4. An A-Frame Fire:
Make the letter "A" out of large kindling or small fuel in the center of your fire pit. The wood you choose should be about 12" long and about 1"-2" in diameter. The sides of the "A" can rest directly on the floor of the fire pit; the "crossbar" should rest on top of the sides.
Place tinder inside the top triangle of the "A" so that one end of each twig is resting on the floor of the fire pit and the twigs are all leaning against the crossbar of the "A". The result should be a sort of miniature lean-to of twigs. Don’t pack your tinder too closely—make sure you’re leaving enough space for good ventilation.
5. High-wind alternate a Lean-to Method:
If you have a high prevailing wind at your campsite and want to plan your campfire so that this predictable wind doesn't hamper your fire-starting, consider the lean-to fire instead.
Lay down a squat pile of newspaper and kindling, and then place a large log as a windbreaker in front of the pile.
Lean some kindling and small logs over the pile, so that they stretch from their propping point on the large log all the way to the ground beyond the pile.
When you light your pile, the large log will protect the infant flame from wind.
It’s not as desirable a scenario as the teepee, because the large log might not catch well, but will be easier to make in really bad wind coming at you mercilessly from one direction.
6. A Campfire Must Breathe:
Fire needs oxygen, so make sure you space your logs and kindling with gaps that allow oxygen to enter the campfire. If you just pile logs on top of one another, you risk smothering a fire. Even wads of paper can smother a fledgling fire.
7. Don't Make Gaps too Big:
Though a campfire must breathe, it also must catch. Especially as you first start lighting your campfire, be sure that the logs and kindling, though spaced to provide air, are close enough to one another to spread the fire amongst themselves.
8. Keep Your Wood as Dry as Possible at All Times:
Damp wood can dampen your spirits – difficult to burn and smokier, too.
9. Desperate Measures:
If you anticipate using damp wood or trying to start the campfire in windy conditions, you might consider visiting your local outdoors store to buy a package of fire-starting aids. Some come in the form of fuel sticks or tinder pieces. You can even find flammable pastes that help in bad conditions. Campfire fuel sticks or tinder pieces serve as both match and kindling, to some extent; they burn longer than matches and are larger. But you’ll still want to have some kindling to ensure that you make a healthy campfire, and you'll still need matches to light the fuel sticks. Pastes can be applied directly to surfaces you want to burn.
10. Practice Proper Campfire Safety:
Being burned figuratively by a campfire is bad enough; don’t let yourself be burned literally.
Don’t joke around with flammable liquids.
Keep your fire well contained within its fire pit. Make sure there are no branches, needles or any other substances entering the region of your fire.
Always keep an eye on your fire, never leaving it unsupervised. Put out your fire before bedtime.
Be mindful of your garments as you tend to the fire. Polyester will melt onto your skin painfully, and loose garments can quickly catch fire.
Fire-gloves are a valuable investment.
11. Maintaining a Campfire:
Whenever you add wood to the fire, Do not toss it on-place it carefully. Throwing or tossing wood onto a fire produces sparks, which can land on something flammable and start another fire. Placing wood carefully also gives you more control over where the wood ends up and helps prevent undesired firewood shifts or collapses.
Keep your fire small and contained. Most of the time, there’s absolutely no need for a roaring bonfire.
If you need to re-ignite the fire from embers, or encourage more flame, blow gently and steadily on a focused area from the side of the fire (not from above). Don't huff and puff and expend great gusts of unfocused air, and don’t use a fanning device. As you blow, be aware of sparks, smuts and ash and where they’re landing.
Think carefully before adding more large pieces of wood to your fire. Plan ahead as to when you wish to put the fire out and let it begin to die down at least one hour before that—longer if you have a well-burning fire full of large pieces of wood.
12. Extinguishing a Campfire:
When you're done with a fire that still has flame, glowing embers or smoldering chunks of charcoal, douse it. Sprinkle (don't pour) enough water to quench all embers and charcoal, but don’t flood the pit. Remember that another person is likely to need to fire pit within a few days (such as yourself the very next day). Use a stick to stir the embers and ashes to get them all wet; turn charcoal over and wet it down on all sides. When nothing hisses anymore as you pour water over it, and you can comfortably place your hand on ashes and charcoal, the fire is sufficiently doused.
Do not go to bed while there is any fire or glow visible in your pit or ring. Left unattended, open flames or glowing coals (even ash-covered embers that don't appear to be glowing) can very easily lead to a spreading fire.
13. Practice:
If you aren’t making a good campfire, it’s possible that you are just out of practice. I’m not suggesting that you make fires all the time, but an occasional practice session in your fireplace is a good idea (saves on the heating bill, too). It takes more than technical prowess to make a beautiful, awe-inspiring campfire; you have to be one with the fire, anticipate every curl and lick of flame, every tendril of smoke. Which way will the flame break if you give it a log to engulf? Your ability to predict this kind of outcome will determine whether your fire sputters and stammers toward aimless, impotent failure, or achieves the kind of rough-hewn, transfixing heartiness you want to provide.
Information From:
How To Do Things
Art Of Campfire ~ Sol Lichtman.
Also Visit ~ Smokey The Bear ~ For More Information